Guitar Of The Month – August, 2023

Congratulations goes out to Serge Léger for his guitar build, to earn him Guitar of the Month for August 2023.
Serge used our JBK-1 kit as the basis to create his guitar.
“Voilà! My second build from a DIY kit from Solo Guitars of a Jazz Bass. I found the first experience of building a guitar so rewarding that it was easy for me to take the plunge to order a second kit. As I embarked on the adventure of building my second bass guitar kit from Solo, I knew I was in for a thrilling and rewarding experience. Everything was centered around the license plate, a hobby I have enjoyed for years – license plate collecting. The guitar isn’t perfect but it’s mine and certainly one of a kind. Definitely a conversation starter.
INSPIRATION:
My inspiration for this bass guitar was drawn from a nostalgic memory of a long-gone era – old fisherman’s wharf truck from the late 70s and early 80s. Specifically, I recall the square-body Chevy trucks that were a common sight along the shores of rural Atlantic Canada during my youth.
SELECTION & UNBOXING:
The first step with my project was selecting the right kit from Solo Guitars impressive lineup. After careful consideration, I settled on the JBK-1. Each component was meticulously wrapped, and the unmistakable scent of freshly cut wood filled the air. It was a tangible moment of promise and potential, knowing that within the box included everything I needed to create my very own musical masterpiece.
SANDING & PREPARATION:
Now began the process of sanding the neck and body up to 400 grit sandpaper to achieve a flawlessly smooth surface. While I paid close attention to the neck, prioritizing a comfortable playing feel, I took a slightly different approach with the body. Here I knew that a heavy, thick layer of paint would be applied, adding to the unique character of this particular build. I also sanded the hardware, but we’ll get to that later.
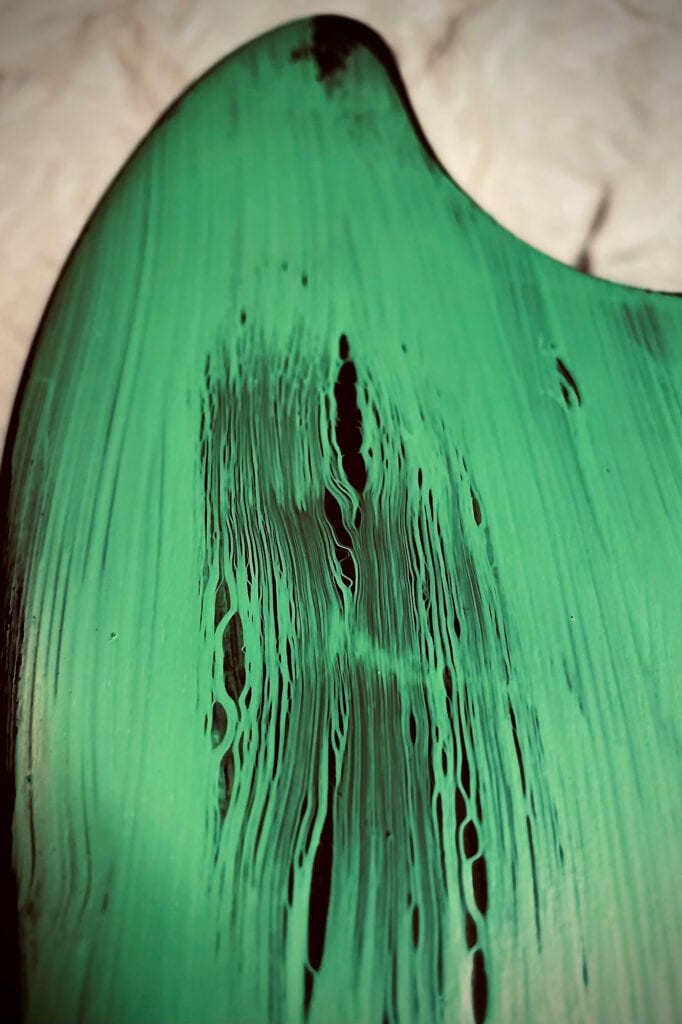
STAIN, PAINT… & CARPENTER’S GLUE?
Recognizing that I wanted my bass to embody the character of a well-traveled instrument, I made the deliberate choice to apply Minwax stain beneath the paint in the form of a sunburst pattern. From there, I applied LePage carpenter’s wood glue in strategic locations and painted over top. The curing of the glue/paint mix is what forced the paint crack. The sunburst pattern underneath the finish unveiled various shades and hues darker along the edges and lighter towards the center as they subtly seeped through the crackled and torn paint. As for the paint, I wanted it to mimic old heavy paint from decades ago that someone may have had left over in the corner of a barn or garage. Paint that could have been used in utilitarian roles such as a property marker or marine paint. The color of the paint which I got from Benjamin Moore was meant to tie in with the license plate pickguard. I used a blade while the paint was still malleable to peel/pick away at specific areas to expand on the rashes. Moreover, this allowed me to practice my first sunburst, knowing that it didn’t need to be perfect as it would ultimately mostly be concealed by the green paint.
TRU-OIL:
To bring out the final finish on my bass guitar, I opted for a coating of Tru-Oil over the painted surface as I knew what I could achieve in terms of results. I began the process by applying thin, even coats on the neck and body, allowing each layer to dry thoroughly before proceeding to the next. In between each application of Tru-Oil, I lightly went over it with 0000 extra fine steel wool to gently buff the surface. Not only did it smoothen any imperfections, but it also aided in leveling the finish, ensuring a uniform and flawless appearance. The number of coats is up to everyone’s individual preference. Let’s just say I applied many. But that’s just me!
NECK & HEADSTOCK:
Keeeping with the theme and to pay homage to the rugged and weathered essence of old wooden lobster traps, I decided to incorporate that look in the neck and headstock with a grey/black Minwax stain. This particular shade was chosen to replicate the appearance of wood that had been exposed to the elements and sea spray, taking on a weathered and slightly damp look of an old wooden lobster trap, an iconic symbol of the maritime landscape.
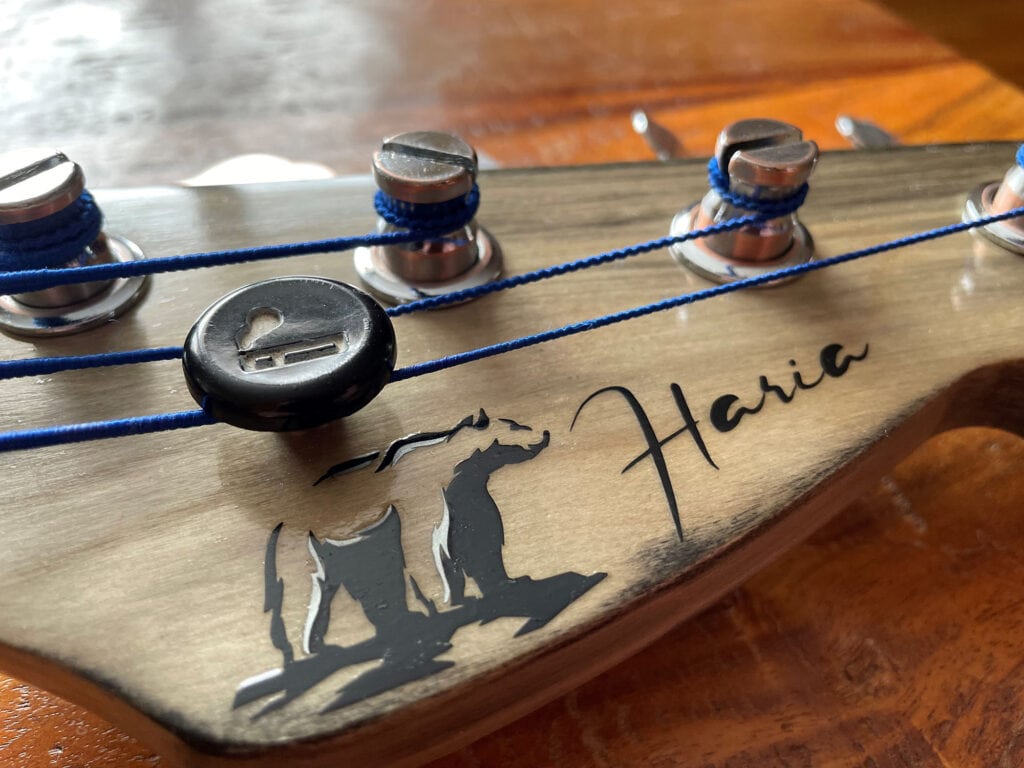
For the string retainer, I wished to incorporate a unique piece that is no longer part of many new cars, but some of us may remember; a cigarette lighter. What old truck wouldn’t have had a pack of Mark Tens or Export “A”s on top of the dashboard? I purchased a lighter from Amazon, and with some modification, transformed it into the cap of my string retainer which I glued on top.
On the headstock, I added “Haria” which is the name of the local group of friends and musicians that I jam with each week. Haria is an old French Acadian word that means noise or simply something that is difficult and problematic. I also included a bear as I’m often referred to as the bear amongst friends and within the community.
AGING THE HARDWARE:
I wanted rust on the guitar to make it look old and weathered, just like the rusty trucks that sat near the salty sea air at the wharf year after year. I began by using sandpaper and WD-40 to scuff all the hardware, giving it a worn appearance. After this initial treatment, I placed the parts in a laundry sink and covered them generously with table salt. To ensure that the salt stayed saturated in water, I regularly checked and added water as needed over the course of a few days. The combination of salt and moisture caused the hardware components to go through a fairly accelerated rusting process.
WIRING IT UP:
While I must admit that my soldering skills are far from expert-level, I was pleasantly surprised that they got the job done. Following the clear instructions provided by Solo, I carefully connected the upgraded Wilkinson pickups and other components. Despite my soldering abilities not being the best, I managed to complete the wiring successfully. It was a satisfying realization that even with my limited expertise, I could still achieve a functional and well-wired instrument thanks to Solo.
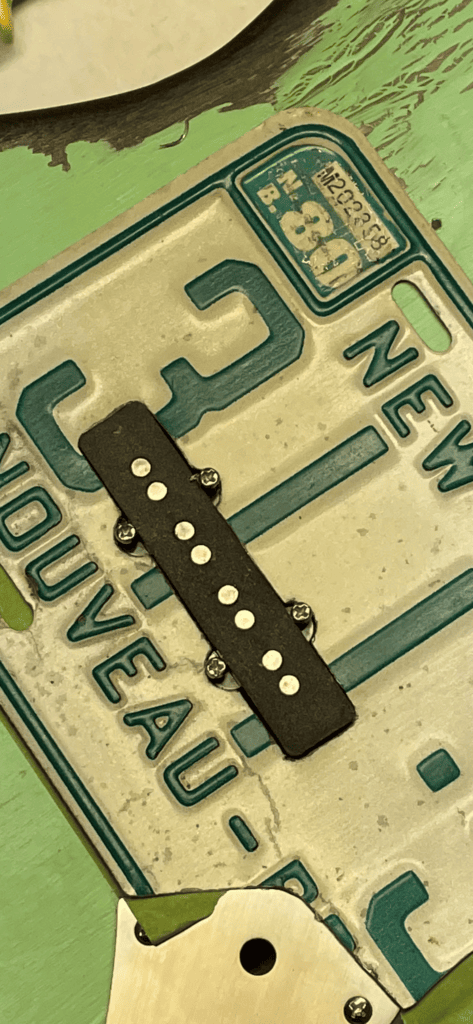
LICENSE PLATE PICKGUARD:
To give my guitar a unique and personalized touch, I decided to use an old license plate as a pickguard. The plate purposely bears a 1980 registration sticker, my birth year and the province where I live, work and play. The plate’s patina proves that It has seen its share of miles during its time. With a Dremel tool I cut and shaped the license plate to fit the guitar’s design. I used the kit supplied pickguard from Solo as a template. In keeping with the theme of repurposing materials, I found some old screws from my garage workbench and used them to securely mount the pickguard onto the bass.
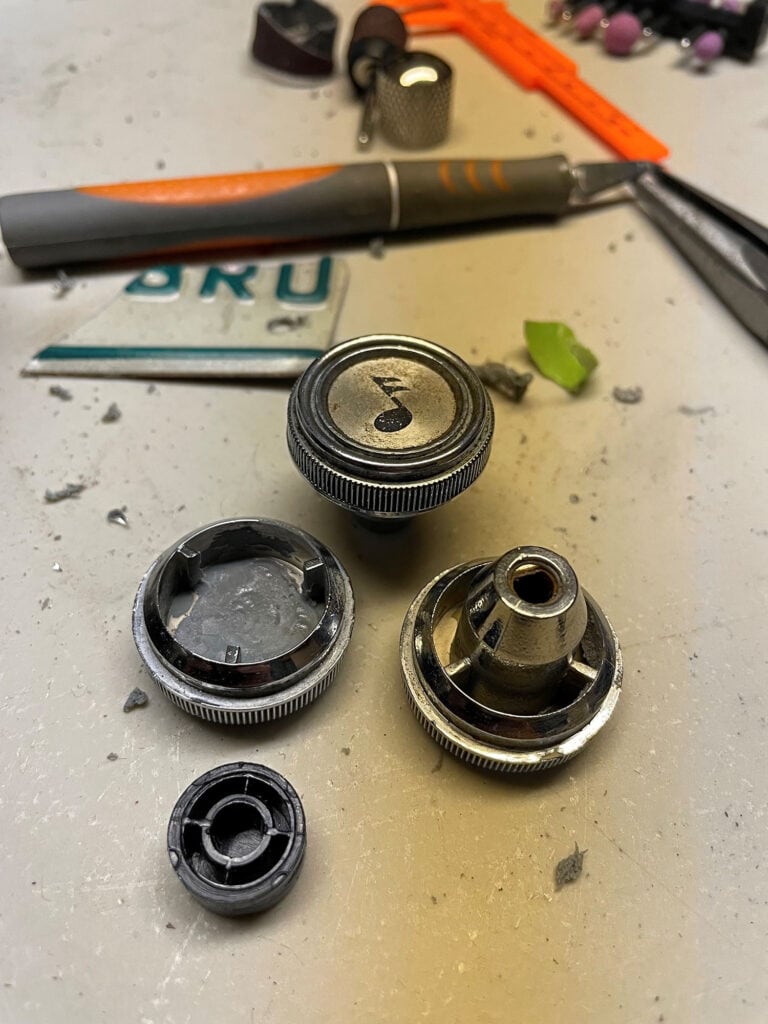
TONE & VOLUME KNOBS:
My FAVORITE detail is the touch of vintage that I brought to the guitar by sourcing original Chevrolet stereo volume and tuning knobs from the late 70s and early 80s through eBay. These authentic knobs felt like the perfect fit for my project. I repurposed the volume knobs for controlling the pickup volumes and the tuning knob for tone adjustment.
With the help of my Dremel I carved out the back side of the retro knobs. This allowed me to integrate the friction fit caps that were inside of the existing Solo-provided components to the old tuners. I used J-B Cold Weld Epoxy to fuse it all together. The results make for knobs that are both very functional and aesthetically aligned with my vision.
OTHER ELEMENTS:
I felt that a simple black seat belt guitar strap went without saying.
On the rear side, there is my Civil Engineering Tech stamp, bearing both my signature and the date, serving as a memento of the winter during which I crafted the guitar.
UPGRADES:
-Wilkinson Neck & Bridge Pickups
-D’Addario Flat Wound Medium Strings
CONCLUSION:
I found the experience of assembling my bass guitar using Solo Guitars DIY kit to be a rewarding experience. The process was made remarkably easy thanks to the well-crafted components and clear instructions. What struck me most was the attention to detail and the quality of the components provided, making the entire process a breeze. One of the standout aspects of this DIY kit is its accessibility. Regardless of your skill level or prior experience with instrument building, you can confidently take on this project. All the pieces thoughtfully designed to ensure success.
As previously mentioned, my guitar undeniably sparks conversations among both musicians and non-musicians. Additionally, I frequently receive compliments on the remarkable sound and tone of my instrument.
The sense of accomplishment that comes with completing your very own instrument is immensely satisfying. Trust yourself… DO IT!
Thanks Solo! “
– Serge Léger


4 Responses to “Guitar Of The Month – August, 2023”
Serge, what a creative build! I love what you’ve done on this. The knobs from old car stereo parts are brilliant. Enjoy it!
Really like these custom knobs, will surely try to do some , as it gives way more options to choose from 🙂
Good job !
Serge, I just received two kits from SOLO and super stoked about getting to work.
Are you in the South East part of the province, say around Shediac?
Beautiful job, 1st thing that caught my eye was the NB plate…
Thanks everyone for the kind words and yes Daryl, I’m from Cap-Pelé actually.