Guitar Of The Month – February, 2023

Congratulations goes out to Tony Calaiezzi for his guitar build, to earn him Guitar of the Month for February 2023.
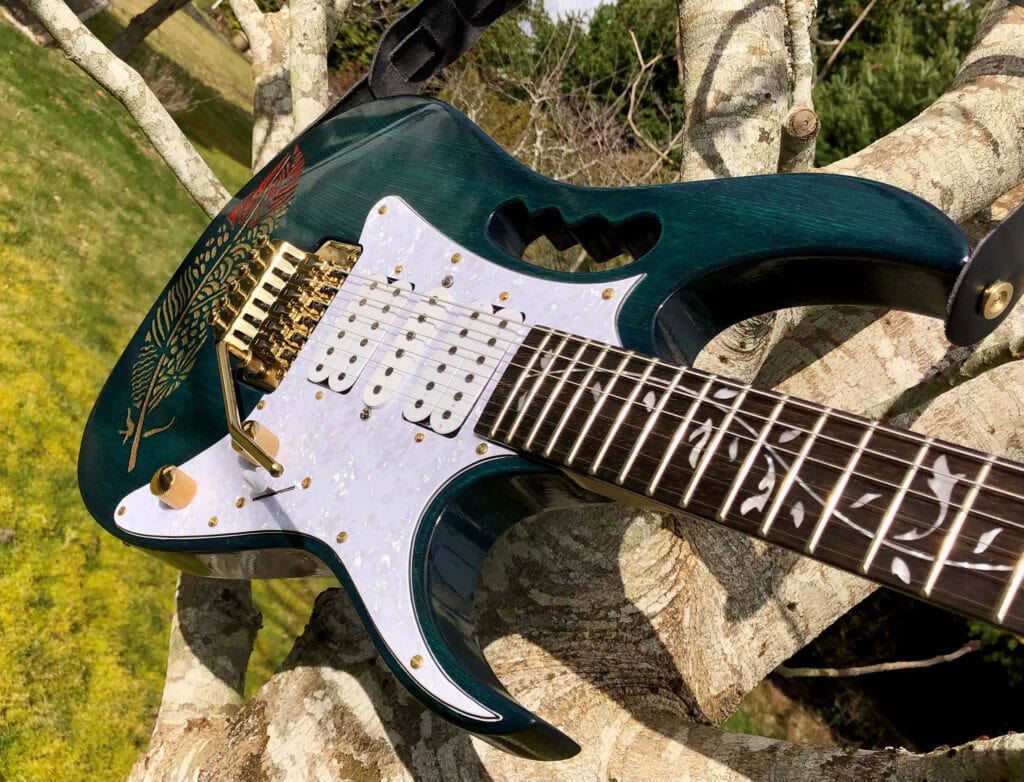
Tony used our JEK-10 kit as the basis to create his guitar.
“I decided to build a kit guitar, using only the stock parts to prove to the non believers how great the quality of the Solo kits are and what a builder can achieve with a little care and attention to detail” I was inspired by Solo’s Guitar of the month reviews, and the good review from other kit builders on Solo’s web site, and the fact that I gave away my Ibanez guitar and a Boss effects system to my son in-law last May, I decided the JEM kit was for me. When I bought this kit, I felt like I was cheating, as all the hard work was already done. I have built quit a few custom bass guitars from scratch, without templates, and all freehand routing.
This build was a collaboration with my artist daughter Tracy. I wanted something unique carved into the front of the body. She did an amazing job.
I wanted the guitar to have a translucent finish since the body was Ash. I ordered Saman water based stain from Solo. I chose turquoise and navy blue as my colours. I was originally planning to do a blue burst style finish, but quickly realized that the pick guard covered the burst area, and that style wouldn’t work. The other thing that caught me off guard was the wood tones were very similar on the front of the body, but the lower third on the back of the body was a lot darker, and it would be difficult to mask the glue line on the back of the body. The body is basically made up of 3 pieces of ash with different grain patterns ranging from deep wide open grain, and mahogany like darker, tighter grain. I decided not to use grain filler on this build. I did use a wet sanding technique I saw while watching a video from HighLine Guitars. I didn’t wet sand the raw wood with polyurethane and mineral spirits like he did. I did the sanding with rub-on oil based polyurethane after sealing the stained guitar body with rub-on polyurethane. I did this style of sanding and sealing mostly on the front of the body between coats of polyurethane. So basically the grain that is filled, is filled with gloss rub-on polyurethane. I know that it is a waste of polyurethane, and it took way longer than expected, as I waited 24 hours between each coat of polyurethane. About 3 days into this process, while taking my guitar body down from it’s drying hook, I accidentally banged the back of the body on a sharp piece of metal, resulting in a 1/4” deep by 1/4” wide puncture. The body at this time was starting to look amazing. I drop filled the puncture with Glue Boost CA glue and polyurethane. This fix delayed my progress by about 3 days.
I live on the West Coast of B.C. and the winters are cool and wet, my garage is not heated, so when your are working out there, water based stain does not work the way it does indoors at normal room temperatures. It is not absorbed by the wood the same, and working with two or more stain colours is difficult. I learned the hard way, causing me to sand it all off a few times, and starting over.
My staining procedure:
Sand the body to 320 grit.
Stain the body and edges with Navy blue.
After the stain dries, sand it down with 320 grit, leaving the grain and edges blue.
Apply multiple coats of Turquoise stain with more navy stain about 3/4” from the edges.
Let it dry, and lightly sand any raised grain, touch up the odd area with turquoise stain.
Apply clear coats:
I applied at least 3 clear coats of rub-on polyurethane before trying to do the wet sanding with rub-on polyurethane, in my attempt to fill the grain. I worked on one side of the body at a time.
I don’t remember how many coats of polyurethane is on that body. In between the wet sand procedure, I would apply a coat of Professional Diamond Coat Varathane. I actually used 1 can of this material on the body.
The neck was in excellent shape, all it needed was fret polishing, and touch up some of the sharp fret edges. I just sanded the back of the neck down to 800 grit, and applied 3 coats of rub-on polyurethane. It’s is silky smooth and feel fast.
I ended up mixing black, navy, and turquoise stain together and stained the back darker, it still has a turquoise tint. It is just about as slick as the front. Now the glue line and the different colour wood is invisible. It feels smooth to the touch.
Here’s some things that I learned:
Staining:
Water based stain is very forgiving, but you should do the staining indoors at normal room temperature for the best results.
If you sand with a 400 grit on your clear coat finish, you can apply this water based stain on top of a clear coat, and after it dries, you can spray clear on top of it, and I didn’t have any problems with the clear not sticking. I used this technique whenever I sanded too deeply on the edges. I even dabbed this stain on the front, and back of the body, creating a 3d effect in the finish similar to the custom chopper paint jobs in custom motorcycle magazines. The pictures that I took don’t do the guitar justice. If you look at the guitar body in bright sunlight, it looks more blue, in dim light green. At different angles, you see the 3d patterns in the finish. Any unfilled grain on the body sparkles in bright light like a diamond.
Setup Notes:
I set up this guitar the same as my Godin Freeway classic, as it had the same strings, and scale length.
Neck relief at the 9th fret 0.01”
String height at 24th fret (Low E 3/64” High E 2/64”) with No Buzzing!
I set the saddles the same as my Godin for intonation. This setup worked great, my tuner showed that each string was in tune and perfect pitch up to the 24th fret. I had to take the Floyd Rose bridge off of the guitar, and disassemble it. The saddles on this Bridge are different heights, so that they can match the fretboard profile. The saddles were in the wrong positions. I re-positioned them and then everything was fine.
Pickup height:
Bridge Low E 1/8” Height E 4/64
Neck Low E 5/32 Height E 4/32
Middle Low E 4/32 Height E 2/32
The weird humbucking pickup height is because the magnets on these pickups are stronger than a single coil pickup, so I had to lower them so much because they were affecting the string vibration.
The guitar plays well, holds its tuning, the Floyd Rose does the job, the pickups are decent, and remind me of the Seymour Duncan Pearly Gates set. I get good pinch harmonics, sparkling highs and when on a high gain channel I can get a decent Van Halen sound. The only thing that I would consider changing on this kit would be the pickups. It plays as good as, and looks as good as any $1500+ guitar, it’s a great kit, and I am glad that I bought it!”
-Tony Calaiezzi


3 Responses to “Guitar Of The Month – February, 2023”
This is an example of a great build. I do agree with Tony. The products from Solo are all of great quality. I have built a number of their kits, all have been a success. Great job, Tony with your JEM.
This is a great build. That finish and colour? Mwaah! Chef’s kiss.
What a cool looking JEM style guitar. Nice job! I have the JEK-0 kit I’ll be building after xmas. Thanks for the setup tips.