Guitar Of The Month – July, 2021
Congratulations goes out to Glenn DeGeer for his guitar build, to earn him Guitar of the Month for July 2021.
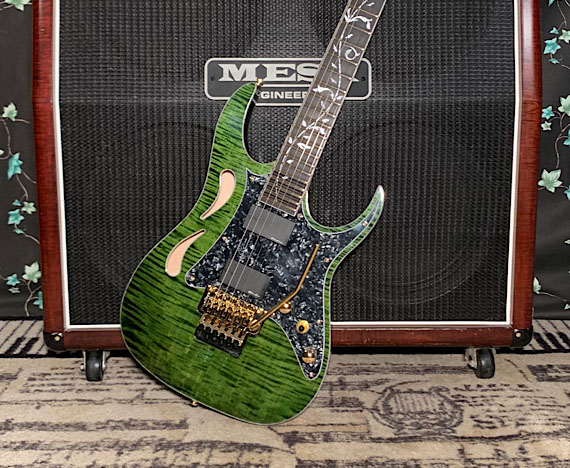
Glenn used our JEK-10 DIY kit as the basis to create his guitar.
“It’s been said that confession is good for the soul, so here is mine: I don’t like most “classic” guitars. But several months ago a friend of mine lent me his Rarities Fender Semi-hollow Stratocaster and I was genuinely shocked at how good it sounded as standard Strats and Teles don’t appeal to me. That encounter spawned an idea: What would a modern high-performance “Shred” guitar be like if it was also a semi-hollow? A quick internet search revealed how few guitars actually exist like this, and once I came across the Dean Vinman2000, I knew it could be a possibility. So began my adventure down the rabbit hole…
Being a regular observer of the “Guitar of the Month” from Solo guitars, I finally decided to bring my 30 years of professional woodworker/cabinetmaker skills to bear on this project and also have a bit of fun competing in the monthly contest. Since my business had slowed down for my custom wood shop during the Covid lockdown season this past spring, it provided a rare opportunity during the little bit of free time between the usual 1 off custom jobs. Although I have built approximately a dozen custom electric guitars from raw wood before over the past 30+ years, this would be a first to see if guitar kits were up to snuff!
So my criteria for the guitar was that it must have at a minimum 24 frets, a Floyd Rose tremolo, and 2 humbucking pickups. That narrowed the choice down to a small selection of Solo kits, of which the JEK-10 “JEM” styled guitar was a natural choice (incidentally my favorite JEM guitar was the 10th Anniversary edition which provided many styling cues for this build). But major modifications and substitutions were going to be required to build what I envisioned in my head as I really wanted to push the envelope of what could be done to a kit. What follows is an overview of the steps of the wood modifications and a brief word regarding finishing & final assembly/setup.
The guitar body is where all the action was at. First thing was to route out a flat rectangle that went from the tremolo cavity to the neck pocket: this is something I had seen from a YouTube video on the making of John Petrucci’s Majesty guitar. I used the same concept to add mass to the center of the body seeing as how large areas of wood were going to be removed from the wings and I was also hoping it would help ward off undue feedback when using high gain amp settings. I had a nice heavy piece of Honduras Mahogany in stock with a solid bright tap tone that was well suited to the purpose. Once glued in, the entire body was thickness sanded with about 1/8” removed of both front and back to allow for the new maple top and back which eventually would give a final 1 ¾” thickness. Then the body wings had the bulk of the material removed by jigsaw, internal edges sanded with mini drum sanders and also a multi ½” diameter hole pattern was drilled in the forearm bevel. This area needed wood to be left there to provide support for the face wood which was to be a bent Drop Top technique accomplished with 3 V-groove routed relief cuts on the backside to give the top some flexibility for the across grain bend. The top and back woods were some 5mm thick book matched 3A soft curly maple sets that I had in stock which I thought to someday use as backs only, but one was slightly better; just good enough to use as a face when overlaid with a pickguard. Luckily the practice staining I had tried on one half a long time ago (which is seen in some of the pics) would not affect the finish I was going to do so it was acceptable.
The trickiest part of the entire build was the tummy cut that most strat style guitars have. The pictures included hopefully show the technique used to accomplish this which was by filing a bevel area with a nailed on supporting ½” MDF piece. Then 3 thin 1.5 mm maple pieces were individually gently bent and 1 at a time glued to the ½” body edge in the dish shaped void. After removing the MDF was the process of leveling of the new 3 layer dish wedge to the body, including flushing to the back through my thickness drum sander. Then the flame maple back and front could be positioned on the center line and independently glued on. Lastly, a 4th and final 1mm piece (taken from the back offcut so grain and wood color matched) was glued in on the tummy cut to minimize the glue lines. The joint was barely visible and while I’ve never seen another guitar done like this, having done it now I would possibly consider using this technique again.
The 2nd hurdle was creating the binding wrapped ‘flower petal” shapes for the area that usually has F-holes. This would mimic Steve Vai’s newer PIA guitar: a design far more appealing to me than the Monkey grip style. A router template in ¼” clear acrylic was created by hand using a drill, jigsaw and files. Then after routing the 2 shapes in the maple top came the difficult part of wrapping the inner surface with the white Pearloid binding from a single piece. I used a paint heating gun to soften the plastic slightly and then gently bend and spot glue it a bit by bit until finally hand cutting a near invisible butt joint when the piece came back to the start point.
The final body processes were then fairly basic: drilling out the original neck pocket holes, tremolo post holes, and routing of the Battery Compartment, tremolo recess area and new pickup cavities. The binding channel was cut with a standard Stewmac binding router bit, which was mounted to my own custom made floating router base to follow the Z-axis change in the drop top, tummy cut and heel contours. Gluing the binding on with both Acetone and Weld-on 16 went fairly well using the heat gun again to gently bend when changing plane direction. The top binding was all 1 piece while the back was 2 pieces, with the tummy cut binding piece mitered in separately as the last step. The final body processes were drilling the usual pass thru wiring holes including 4 small holes in the Humbucker routes to allow the small 1/8” LED lights to poke into the upper wing, allowing 4 Green LEDs to illuminate thru the 2 flower petal cutouts.
Last was the easier stuff: the work on the neck. My favorite profile is a compound radius on a fretboard (my gauges showed the kit neck profile varying at 10-12”). Once I decided I had to go with my preferred 12-16” fingerboard radius, I knew it would also be an opportunity to use for the first time ever some new Jescar Gold X-Jumbo fretwire. So to start with I filed and sanded a profile to a modern C shape of 20-22 mm (nut to 12th fret) to the back of the neck. Afterwards I added a 1mm thick veneer made from an offcut of the top curly maple wood to the headstock. Then using a scrap of wood clamped to the fingerboard for a straight edge, a flush cut bearing bit cut the binding notch along the fingerboard edge. Afterward I switched to use the aforementioned StewMac bit and chisels to complete a binding channel around the headstock. After the binding was glued on, I then filed the scallops in the last 4 fretboard spaces just like a true JEM guitar. It was my first ever attempt at scalloping and unfortunately, I went a bit too deep and lost the 24th inlays and almost the vine as well! Although not planned, it also presented no major problem so work continued and I don’t mind the look anyways. So after final neck shaping, the fingerboard was sanded to the desired compound radius which was then followed by a careful staining with Feiblings Black Leather Dye on the already very dark “rosewood” fretboard to even out the grain variations and the colour came out looking very ebony…Bonus! Last was the tedious work of installing the new frets: cutting 24 pieces to size, clipping and filing the end tang notches and then fret pressing them in with wood glue. The final fret level, crowning, dress and polish went normally; though I could immediately tell how much harder the Gold fretwire was!
For the finishing process I’ll try to be brief as many others have written along similar lines before. After sanding to 220 grit, I used KEDA powder stains in water for the black, green and yellow as I knew using the water based would not pose a risk of staining the plastic bindings. Black was first wiped on everything except the back of the neck, and then next day using 180 and 220 grit I sanded again so only black remained in the sapwood. Then I applied the green stain to highlight the heartwood and also further darken the black already in the sapwood areas. Yellow stain (to help with the grain “pop”) was sprayed on immediately while the green stain was still semi-wet in a final light coat and wiped off to complete the staining.
After 3 days of drying the water stain, clear high gloss Goudey NC Lacquer was thinned down and sprayed twice as sealer on the stained guitar parts. Next the bindings on the body were masked off and black lacquer was sprayed on the edge of the body. For years my guitars have used a vinyl headstock emblem designed by another friend of mine so I applied one once again, this one made from thin 24K gold vinyl (yes real gold!). Then the remaining 8 coats of clear were sprayed on with 320 grit sanding between each coat, and the back of the neck had only 4 coats of low gloss sprayed on to help prevent stickiness. While I allowed for the lacquer to cure, I made a new Black Pearloid pickguard, truss rod cover and back plate which would not only blend better with the overall colour scheme and black pickups but also because I never use a middle pickup, I wouldn’t have to live with the kit pickguard with an empty center slot. After the 2 weeks of drying time had passed, I did standard wet sanding using mineral spirits and grits from 600 to 1500. Buffing was next which was done on my 2 cotton wheel home built buffer using dry compounds: medium and fine. StewMac Fine and Swirl Remover pastes were hand buffed as needed as a last step with cotton cloth and foam orbital pads.
After lining key areas with Copper Foil sheilding tape (including overtop the 4 now installed LED wires), the wiring was fairly basic other than both Master Volume and Master Tone pots are Push Push allowing for Series to Parallel wiring for each of the direct body mounted Lace Sensor pickups (D-100 and D-150). For switching I prefer the simplicity and feel of a LP style 3 way switch, which when combined with the P/P pots, gives a total of 8 different noise-free pickup tones. The LED’s have a micro toggle on/off switch in the back behind the tremolo claw, and the tremolo is an upgrade to a Floyd Rose Special. Other steps of the final assembly such as strap lock pins, tuners, lock nut, and pickguard mounting went without issue. As a final thought, with the 9V battery box already in place, I’m considering an upgrade to the bridge with Graph Tech Piezo Saddles in the future.
So, in summary, with the added mods and upgrades the results were that the guitar plays and sounds very good with the semi-hollow effect definitely present even with high gain. The addition of some higher quality hardware/electronics and decent figured woods visually and tonally lifted the kit to a new level while shaping the neck to my preferred specs provided a much faster and more comfortable feel.
It was a fun journey and pushed some areas of skill that I have not attempted before but with more guitars to inevitably be built, I’m already envisioning the next build!”
-Glenn DeGeer


2 Responses to “Guitar Of The Month – July, 2021”
This is jaw dropping. Great work Glenn. That colour and maple grain is stunning.
Glad you liked the guitar and thanks for the comment! I’m definitely addicted to stained highly figured maple…lol!