Guitar Of The Month – May, 2022
Congratulations goes out to Randy K for his guitar build, to earn him Guitar of the Month for May 2022.
Randy used our LPK-100BN DIY kit as the basis to create his guitar.
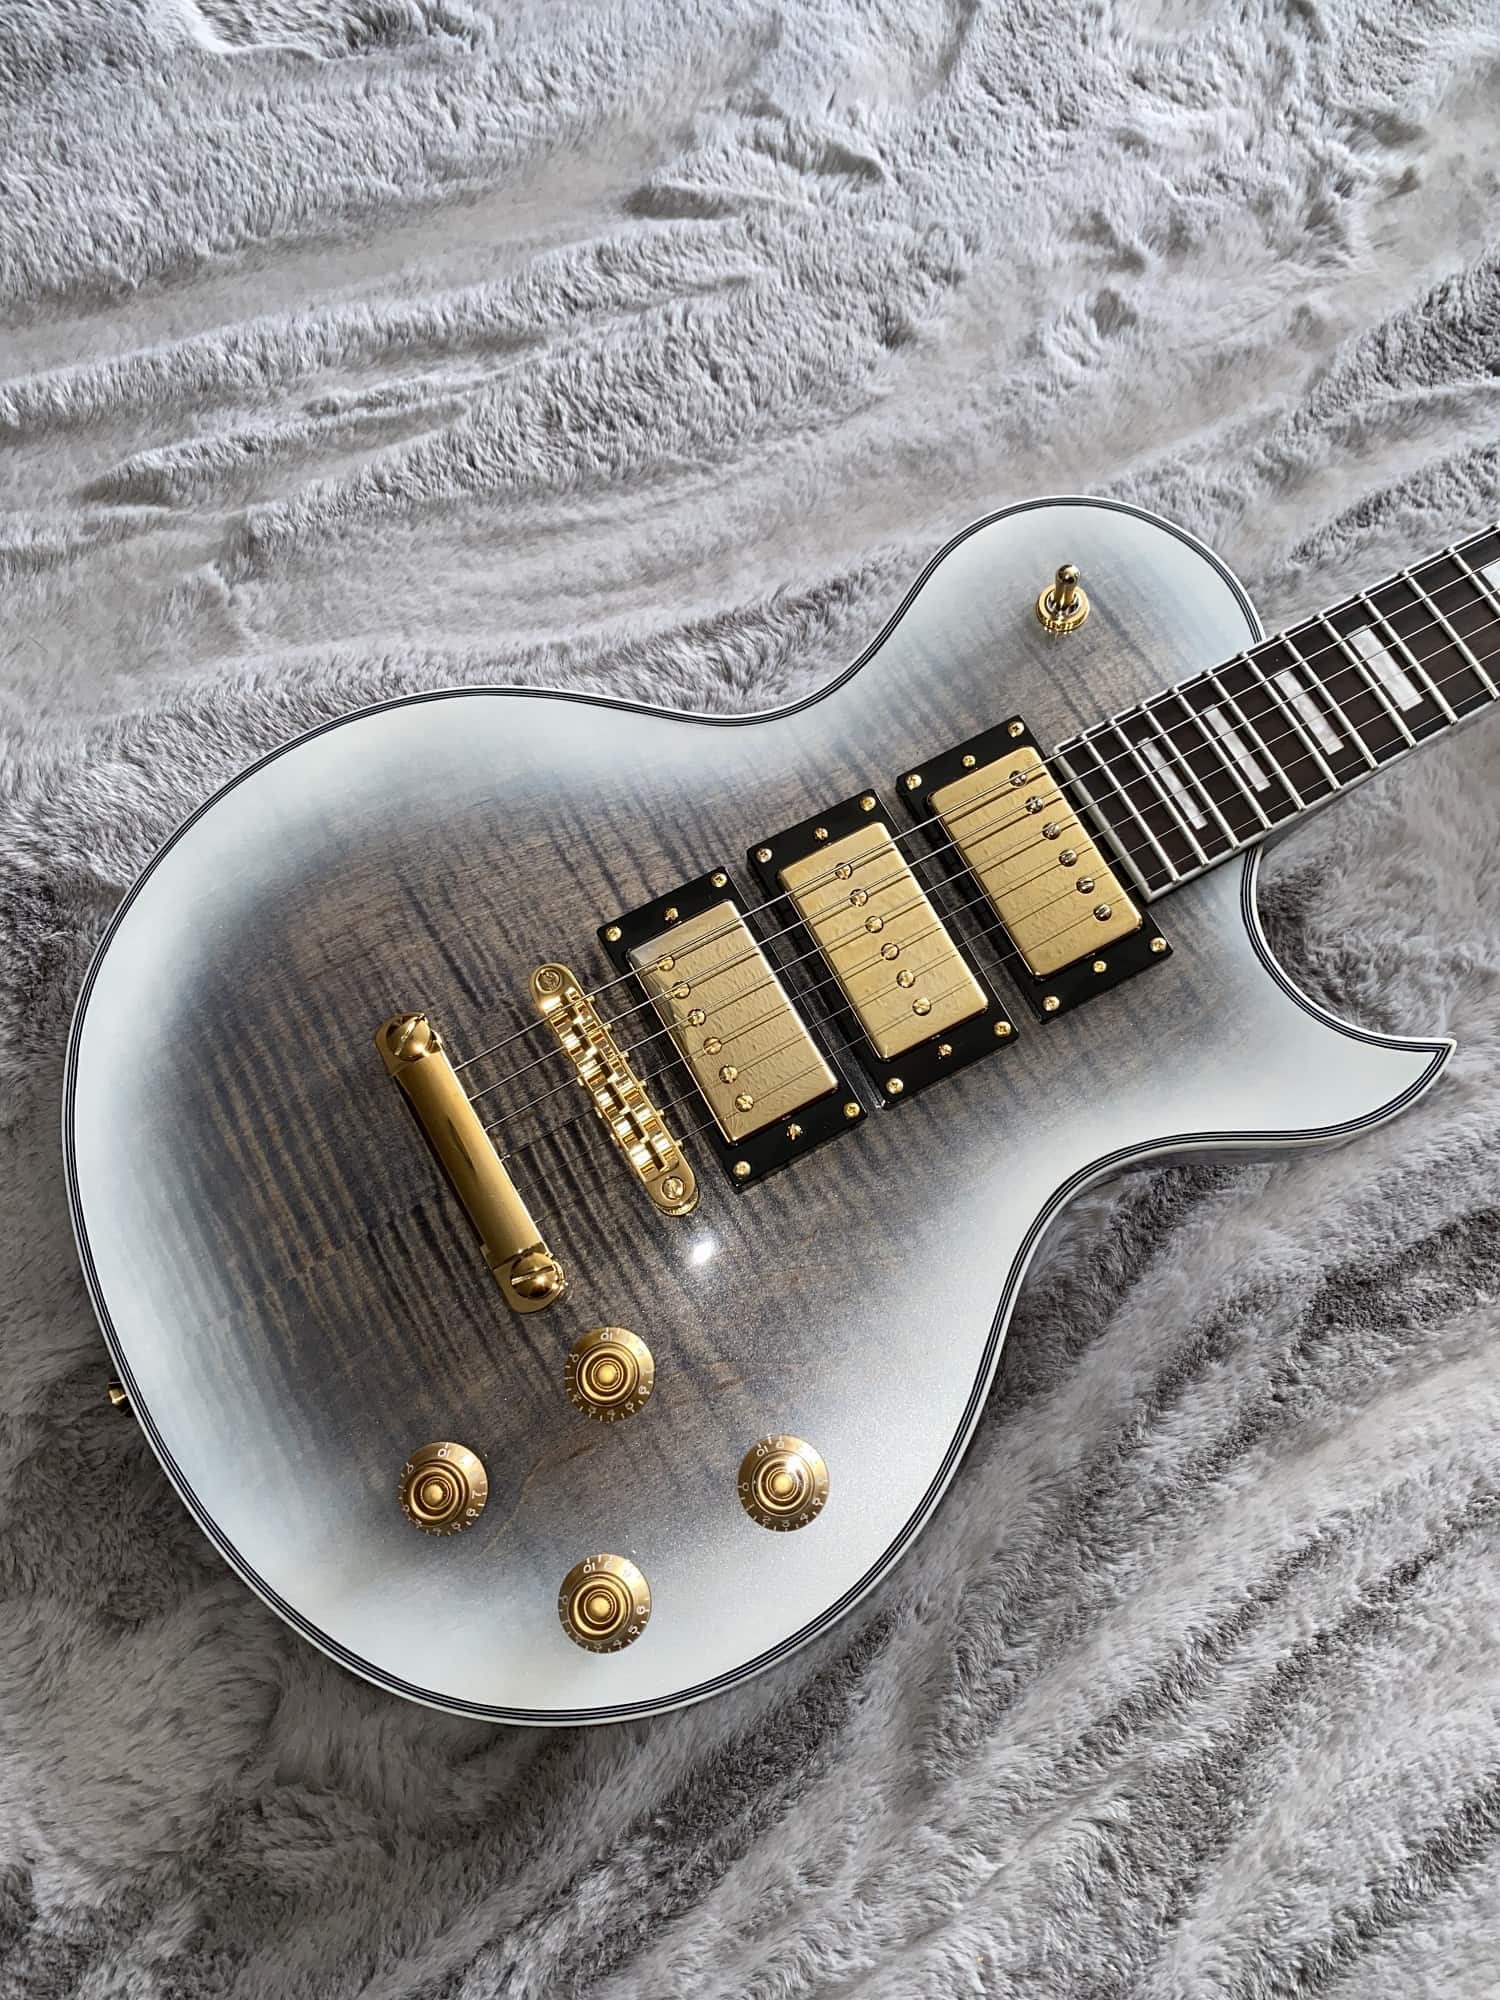
“When I think about starting a guitar project there are a couple of methods to consider. The first is to pick a kit style that you want to build and based on the actual wood grain pattern and its colour you then choose an appropriate finish that best suits it. The alternative approach is to start with an idea or concept for the look and finish you want to create and then select the wood and guitar kit that will achieve the result you are looking for. I used the latter approach for this project. My idea was to create a white pearl finish guitar and somehow retain some wood grain highlights. After a lot of thought and test swatches I landed on a dark fade curly maple under a pearl white burst. I chose the LPK-100BN kit for this project as it offered maple cap with some figuring as well as an alternating black/white binding which creates an awesome border for the pearl white around the edge. To give the top some depth or dimension I decided to try layering navy blue and black in the figured maple. It all seemed doable but what seemed like a relatively straight forward finishing process actually became quite involved.
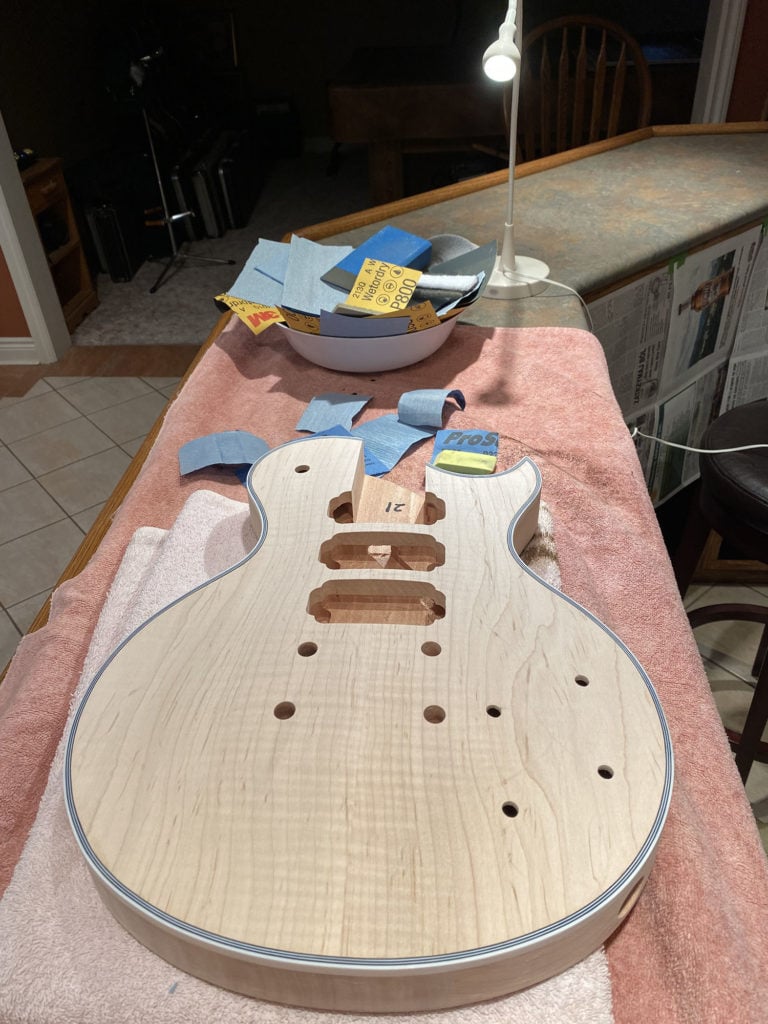
The process began with the obligatory sanding process to remove all scratches and areas that will otherwise become very noticeable when dye stain is applied. To get the best results on the top I decided to sand to 400 grit. This was done so that I could better control the amount of dye that is absorbed into harder grain versus the soft end grains. I first applied a diluted black dye and sanded back to just leave black in the soft curly part of the grain. Next, I applied navy blue over the black and sanded back again. Unfortunately this left a slight blue hue on the areas that I wanted to leave relatively natural. To correct this I reapplied the black and sanded back again. This approach was continued until I was happy with the result. Having a maple cap provided ample room for all the sand-back iterations. The first coat of sealer was sprayed on using a “mist” coat of Mohawk’s vinyl sealer. The mist coat is a necessary first step to fix the color on a dyed surface. Additional coats of sealer were using CystaLac Brite Tone sanding sealer added. The top was then level sanded before the spray application of the pearl white paint. The binding was covered with 1/8” Fineline vinyl tape right through the stain and paint process then removed for the final top coats. Only a small amount of scraping was required. The top was then finished with about 12 coats of Brite Tone gloss finish. The schedule was 3 coats per day followed by light sanding each morning. I find that leaving appropriate drying time between coats is essential to prevent hazing on water-based finishes – an even more important consideration for the back of the body and neck when using a clear grain filler.
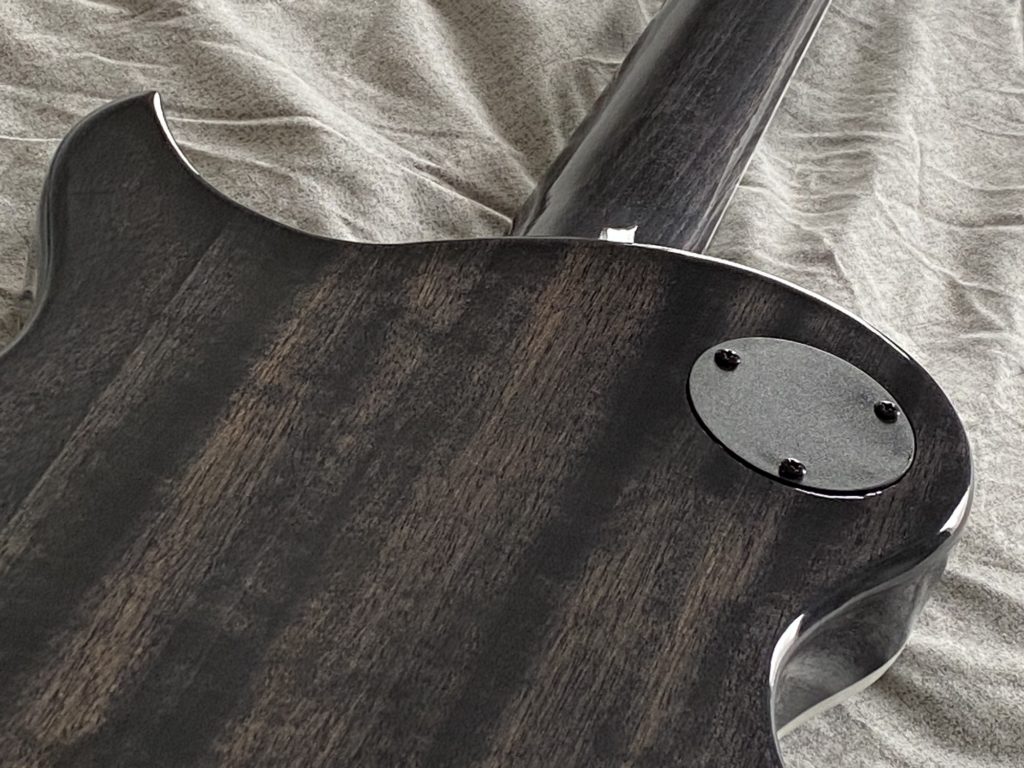
To compliment the top I chose to dye the mahogany back and neck using the navy blue and same black colour scheme while sanding it back to allow the natural color and grain pattern of the wood to show though. The result was a dark finish with a blue and grey tone and hints of the natural red in the mahogany. The finishing process was similar to the top carefully applying sanding sealer then grain filler to achieve a smooth surface. The back needed a total of 16 thin coats of Brite Tone gloss to get a surface that could be safely leveled and polished.
The headstock was finished with an opaque application of black and navy blue, sealed and filled then topped with a touch of clear pearl fade. My water slide logo decal was applied then the headstock was top coated with lots of Brite Tone.
The neck fit perfectly and only some fret leveling was necessary. The frets were polished and the ends were filed smooth. A Graph Tech TUSQ nut was installed and the neck was then glued in place. I chose to finish the guitar before gluing the neck because of the complexity of the finishing process as I find the neck does get in the way.
To compliment the colour scheme I chose to continue with gold hardware as was provided in the original kit. However, all the hardware was upgraded to include Gotoh bridge and tailpiece, Solo Pro locking machine heads and Gibson gold top hat knobs.
Having 3 pickups to play with provided a lot of room for creativity. To me having three humbuckers is a little overkill so I opted to create a configuration that included a P90 style pickup in the middle position. I am partial to the P90 crunch and I prefer classic PAF style when choosing humbuckers for my style of playing. Where I landed was to use Gibson Classic 57’s and a Seymour Duncan Phat Cat in the middle. The wiring configuration I decided on was to have three individual volume controls where the middle volume is switched in and out of the circuit using a push-pull while being able to blend it when the selector switch is in the middle position. I then put a master tone control in the circuit at the end prior to the output jack. All the electronics were upgraded with components from Solo Guitars – nothing like the convenience of “one-stop-shopping” for this stuff.
I put a set of EB slinky cobalt 9 to 46 strings on the guitar and did a complete setup. When I plugged it in and cranked it up I was somewhat surprised. There is an interesting phase relationship between the three pickups and I’m not sure how much of it has to do with the proximity of the pickups and the actual phase of one of them – likely the middle. With hind-site now in full view I could have tested the phase of each pickup at the beginning to be sure but at this point I am not going to take it apart disturb the solder and wiring job to find out. The resulting sounds range from full on humbucking with the middle switched out, to and variety of useful and interesting tones – some thin and some with a “quack-like” crunch as you would expect for the out of phase relationship when the middle is in and blended with either the bridge, neck or both – all of which can be driven by the middle volume control.
The timeline for this project was about 2 months in the making. There were a lot of steps along the way and about 2 weeks of cure time before final buffing and assembly of the hardware and electronics. Having patients is a key and there were times in the finishing process when I thought things were going the wrong way. Thankfully all of the issues were reversible and could be overcome.
The LPK-100BN is a solid kit and is a great platform for creativity and upgrades. This kit in its finished form sets-up easily, plays well and sounds great.”
-Randy K


2 Responses to “Guitar Of The Month – May, 2022”
Nice!!! In my wirings i use in/out of phase a lot, i like push-pulls for phase, and 2-pole 4-position rotary switches for humbucker “modes” – series, parallel, coil A, coil B. Most versatile setups without getting in the way of traditional functionality in my personal opinion.
Beautiful. I was hopeful at maybe winning the guitar of the month but when I see
the quality and attention to detail in some of these guitars I’ve learned not to
get my hopes up!!!
Great job.