Guitar Of The Month – January, 2023

Congratulations goes out to Gary Semkiw for his guitar build, to earn him Guitar of the Month for January 2023.
Gary used our LPK-75 kit as the basis to create his guitar.
“As I already have a couple of sunburst LP style guitars, I decided for this build on going in the direction of the darker custom guitars I’ve seen online by various custom guitar makers.
I had a vision of somewhere between the extremes of some steam punk guitar styles to a more traditional LP yet with a dark industrial look. I really liked the use of metal and faux metal/rust in guitar finishes. I wanted it dark industrial, to incorporate metal, and a faux metal finish.
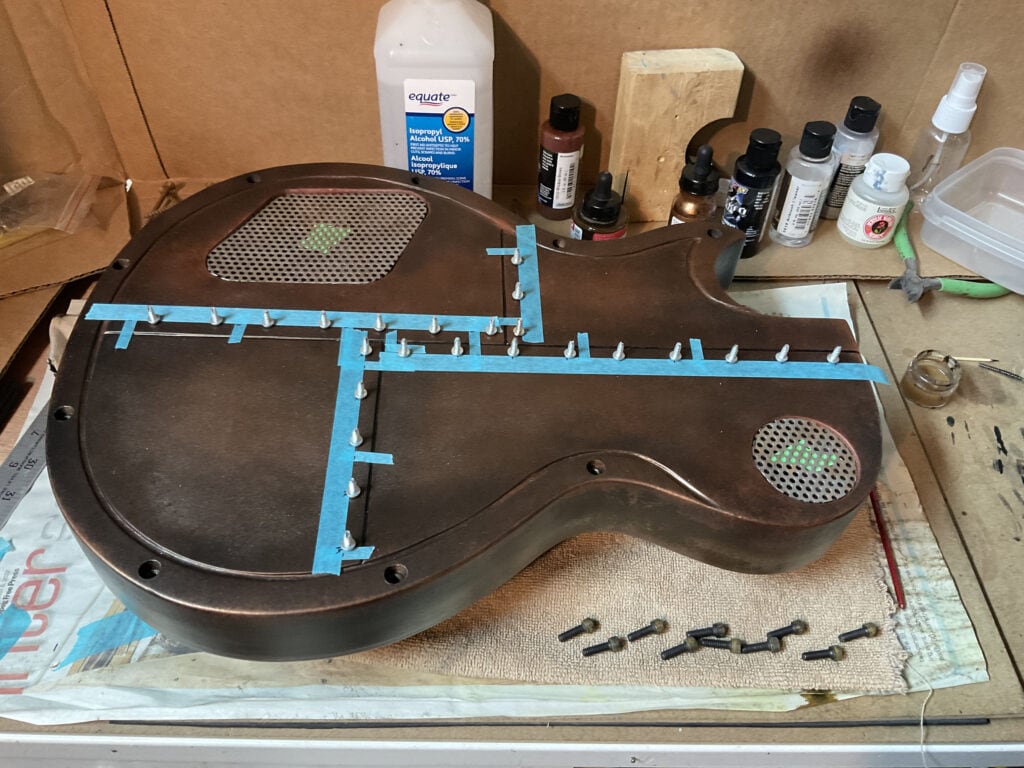
This guitar came from a B-stock LPK-75 kit. My first step was to decide on the metal insert shape for the top. I didn’t want to do the whole top in metal as it would have made the pickup and bridge areas and outer edges too difficult to machine as the top is curved and contoured, unlike the Trussart guitars that are actual CNC machined metal and flat.
To address the metal edges and prevent the metal from tearing up my arm etc. I decided to remove about 3/32” of the top layer of the top, but leave the outer wood edge and the wood pickup/bridge area resulting in a recessed area for the metal insert to install. So going back and forth between cutting the metal and determining fit on the top with clamps etc. using a Dremel and some custom jigs I made, some chisels, and an orbital/mouse sander I removed the inner top where needed and created the metal insert area.
I initially was concerned the contour and curves of the top would cause me problems with the final fit of the metal. Actually the final metal insert pretty well snapped into the narrower pickup selector and single horn recessed areas creating a tension across the metal in the bridge stop area which sucked the metal close to the countered surfaces at the rear of the guitar. I’m no metal fabrication expert by any means but it worked out better than I expected. Also the recessed area did not need to be a perfect NASA level of smoothness as the metal was going to be the final finish.
For the back of the guitar I wanted a riveted metal plate effect so I Dremeled some small lines for depth dimension between the plates and a wider line for the outer edge inner line to match the recess edge on the top.
I made the decision to work in the acrylic world as I was limited in spray booth/spray equipment etc. but wanted to try airbrushing. Based on hours of research I started the painting process by applying various layers of grain fillers and sanding sealers. Best videos I found on YouTube for guitar finishing is the gentleman from Highline Guitars. Very informative.
After the bodywork and surface prep I applied a spray acrylic primer (unfortunately white) to the body. Followed by a coloured spray acrylic rust brown base coat. I then drilled the holes for the countersunk 10/24 Allen head bolts.
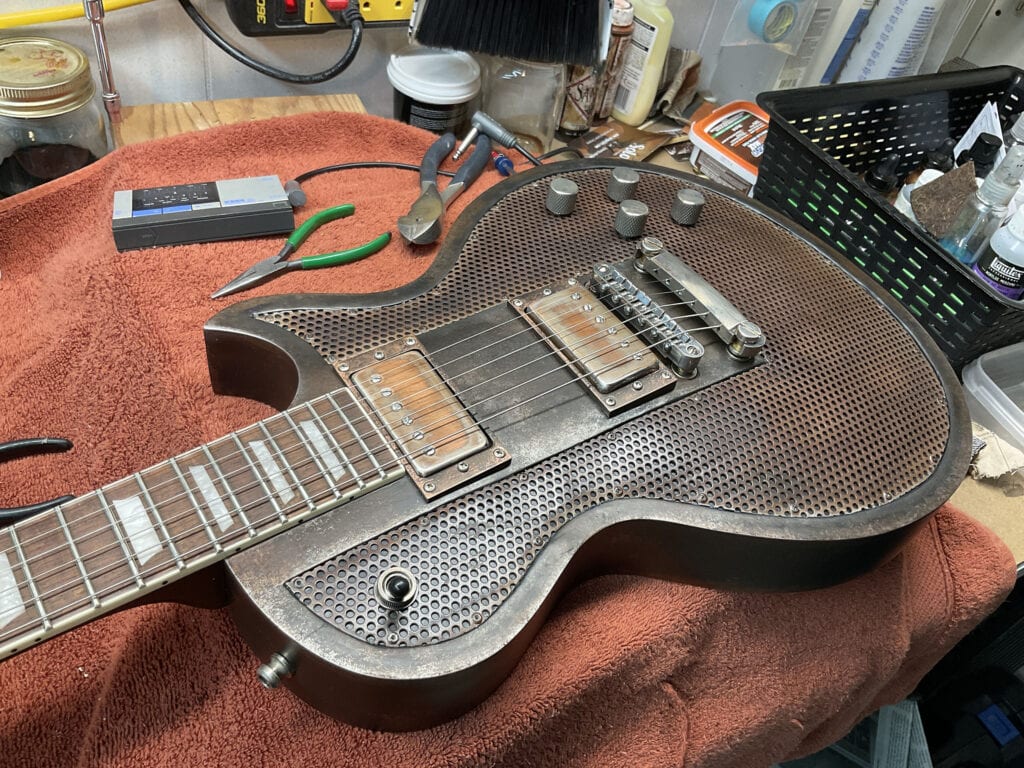
Next came the airbrush application of various colors on the back like aged bronze, black, silver and various shades of browns and burnt umber. I created the faux metal effects by using acrylic extenders, Windex, and a damp sponge.
The sides of the guitar are more bronze based towards the back to a more black silver look towards the top. The top areas are more a darker steel look. I am really happy how the faux metal effects turned out using the Windex and sponge technique. This technique is really kind of unpredictable and kind of finds it’s own way based on what paints you layer, how much you add/remove and alter using the sponge and Windex.
The insert area on the top was done with an airbrush matte black as it is visible through the holes in the metal. The top side bevel and pickup areas were done via airbrush first in a silver metallic then black and some dark browns followed by the Windex sponge technique.
Once I was happy with the body I drilled the holes for the plate rivets on the back, installed them and hand painted the black lines between the plates. The metal top was installed and held in with small aged and painted rivets. I also made a pickup selector and control covers out of the same metal as the top and installed copper tape in both cavities.
Also, in-between painting sessions I was aging the aftermarket bronze metal pick up rings & metal knobs, the supplied tuners, pickup covers, bridge parts, etc., and even tops of the additional rivets and screws. I used various combinations of ferric chloride and muriatic acid. The metal insert for the top was rusted with combinations of vinegar and hydrogen peroxide, and a final airbrush coloring to get it a shade darker in areas. Once I was happy with the result, I sprayed it with a clear matte acrylic.
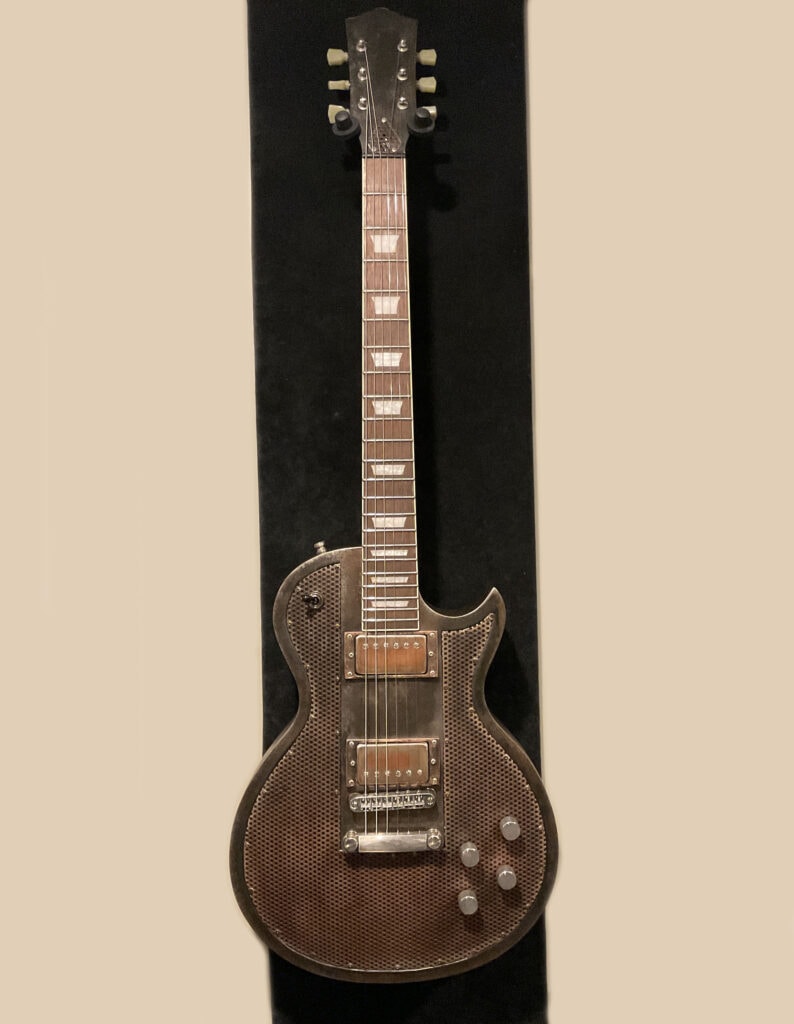
The neck was first finished with grain fillers and sanding sealer. I used a combination of 2 stains. A dark mahogany and a lighter color. The top of the headstock was done with airbrush similar to the pickup bridge area. The fingerboard was also colored and oiled. I finished the back with the Brite Tone matte.
The neck install went fine. Dave helped me with an additional shim requirement to tighten up the joint. I found when I did the final setup the bridge inserts are slightly too close to the neck. Thus the string saddles all intonated towards the back of the bridge. At some point I will likely remove the inserts, fill them with dowels, redrill, repaint the area, and reinstall. The strings all intonated fine I just want it to look better aesthetically.
I ran into some minor final finish issues on the back of the guitar with the hand painted black lines between the plates. I used the Crystalac Brite Tone clear on the back sides and non-metal areas on the top and it worked well. On the back of the guitar I think I applied it too thick and too quick and it messed with the color and lifted the finish in some areas of the grooves. At some point I may correct some of these issues, or not.
Overall I am very happy with the build result. The guitar looks better than I had expected. It really plays amazingly well, sounds great with the supplied pickups, and keeps in tune very well. I did install a graph tech nut as part of the neck work.”
-Gary Semkiw


6 Responses to “Guitar Of The Month – January, 2023”
What an amazing project. I love the look. If Tina Turner had played a guitar in Beyond Thunderdome, it would have been this one.
Outstanding work!! Very creative and time consuming and a superbly detailed explanation. Congratulations on winning GOTM!
looks great way different than I’ve ever seen. did you change anything that came from the box, pickups, tuning pegs? excellent job.
Thanks, that is a perfect comment. I’ve always liked the Mad max mechanical concepts and visuals. I recall in the latest spin of that movie that guy chained to the stage on top of that truck, the wall of speakers, riffing out as the the truck tears across the desert. Crazy.
Thanks gsuderman. It was indeed very time consuming but for me I totally enjoyed it. 80% of this project was new territory for me. I learned a lot during this build.
Thanks Scott. I appreciate the comments. There was a couple of items I changed. One was the pick-up selector switch. I found a gun metal version similar to the ESP and Epiphone style selectors. Another were the pick up rings. I wanted actual metal rings so I could relic them and mess them up. They needed to be sanded & contoured to fit the body of course. I did change the nut to a better Graph Tech black nut.
I used the supplied bridge pcs and the tuners. The tuners aged very well. I also used the supplied pickups. I had to remove the covers to etch and relic them. The pickups sound great. They have great gain and to me sound fine. Also I wanted metal knobs to complete the look which I purchased from Solo. I ground them down a bit and etched them. I used all the supplied pots, caps and wires etc. I did also change the supplied jack to a switchcraft jack and also to a larger metal jack plate.