Guitar Of The Month – March, 2023

Congratulations goes out to Luigi Rostirolla for his guitar build, to earn him Guitar of the Month for March 2023.
Luigi used our LPK-75 kit as the basis to create his guitar.
“This is my first Solo guitar kit build and it is one of Solo’s B-stock plus LPK-75 kits. I named this guitar “Syrax” after Princess Rhaenyra Targaryen’s dragon in “House of the Dragon”. After receiving the kit and seeing the beautiful spalted maple top with “bonus” flame figuring I knew how I wanted to finish it. I immediately saw the flame figuring and the black streaks and wanted to highlight both somehow with some colours resembling fire or flames. This being my first kit build I watched numerous YouTube videos on how to do a dye burst on a flame Maple top. I think it was Darrell Braun’s video that convinced me that I could do it. Now, he did it with water based dyes, whereas I did it with Angelus leather dyes because I wanted to have a bit of time to be able to blend the colours together. Also, kudos to Brad Angove for all of his great how-to videos. Both fellow Canadians by-the-way!
Firstly, I only needed to glue a small bit of separation between the maple top and the mahogany body. It wasn’t a big deal to fix. Just some Titebond glue and overnight clamping and it was fixed. It was definitely worth buying this B-stock kit!
After final sanding with 320 grit I first applied a jet black dye around the perimeter of the top and then sanded it back to leave just a hint of the black in the grain. Because it’s a veneer on top of the maple cap I had to be careful with the sanding so that I didn’t sand completely through it. I also spread a small amount of thinned black dye on the rest of the top to accentuate the figuring. Being spalted maple, it had many natural imperfections that couldn’t be sanded down completely, so again I sanded very carefully. Then I applied red dye around the perimeter at full strength, then blended orange dye further into the center, and finished with full strength yellow dye in the middle and blended into the perimeter. I did the same procedure on the flame Maple pegface. My first attempt on the pegface turned out too blotchy and dark so I had to redo it after sanding back, being very careful not to sand too much. I think I did a pretty good job at replicating a flame burst, especially being my first time using leather dyes.
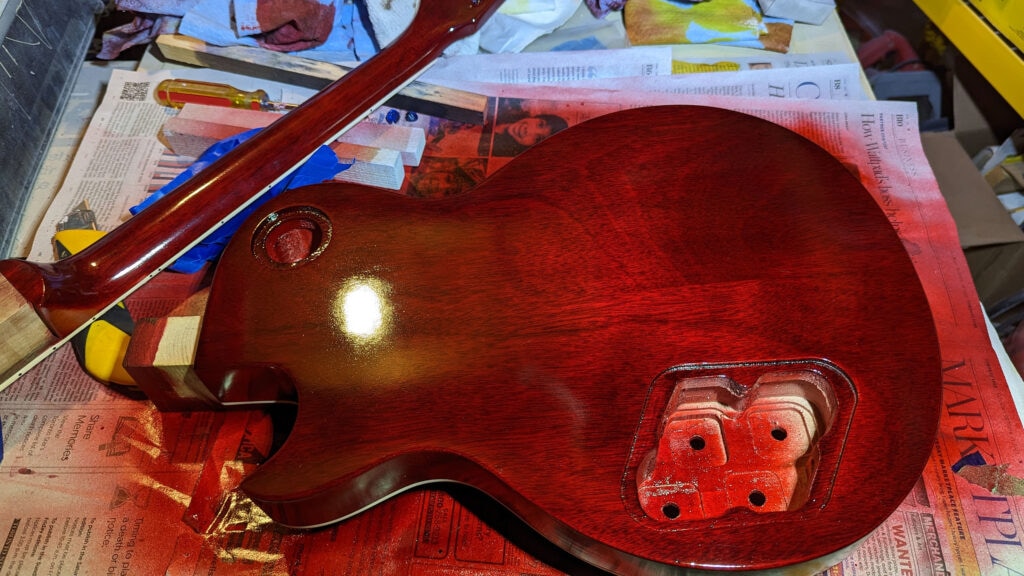
For the rest of the finishing I used the Oxford Guitar Supply “Deluxe Aerosol Finishing Kit” sold by Solo. For a beginner, this was an excellent kit as it came with everything I needed to finish the body and neck in a heritage cherry red and high gloss nitrocellulose finish.
I sprayed the maple with 2 coats of the sanding sealer to “lock in” the dyes. The colours really popped when I did that and I was very happy! Next I filled the mahogany’s open pores with the red mahogany oil based grain filler from the kit. That was probably the easiest step in the finishing process. After lightly sanding I applied 2 coats of sanding sealer, more sanding, then 2 coats of the heritage cherry red tinted lacquer. Now the cherry red colour really popped! I was very happy with the results so far.
I really did not like scraping the binding. That was probably the process that I had the most difficulty with. I had to keep reminding myself that it was a learning experience and that the next one would be even better and hopefully easier. I managed to do it as best I could with an xacto blade and lots of patience and steady hands. This is where I made the most mistakes but I am still happy with it.
I had no issues when I glued the neck onto the body. It fit perfectly; no modifications were necessary. Phew!
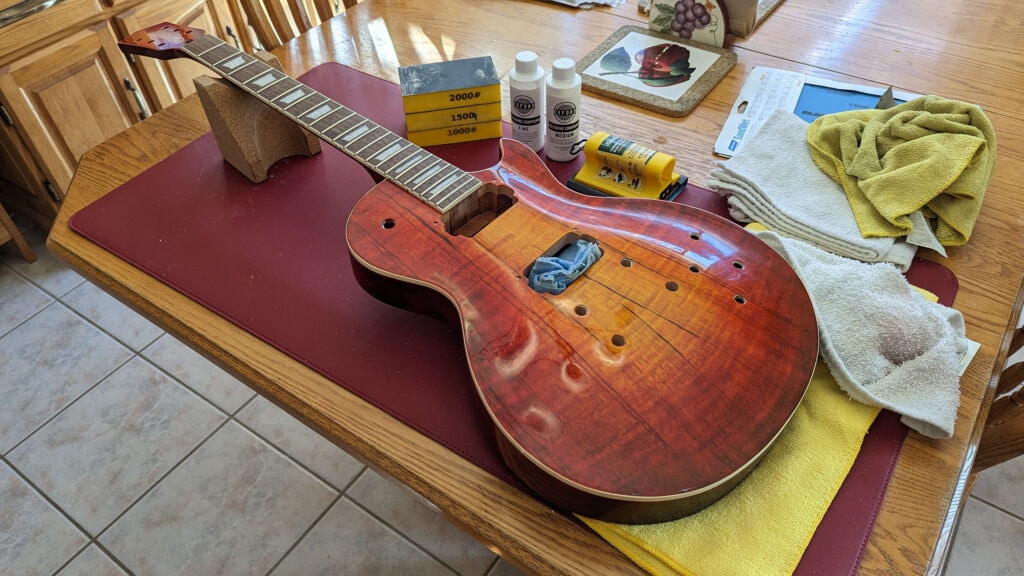
Next, many coats of high gloss lacquer from the Oxford kit to finish it off. I lost count of the number of coats I did! I then let it hang for 4 weeks for the lacquer to harden before proceeding to the next step.
When it came time to polish and buff the gloss nitro, I did it all by hand. I first wet sanded everything with a 1000 grit foam sanding block. I think I spent an entire afternoon doing just that! Then I polished with Oxford’s medium and fine polishing compounds. I must admit that I didn’t think I could do it all by hand, but I did it! My arm was tired!
I did not use any of the hardware from the kit as I wanted all black hardware to complement the black streaks in the spalted maple and the black dye on the perimeter of the top. Installing the hardware was the most satisfying part of the build for me. I had the most fun doing this and I really like how it turned out!
Hardware that I used:
● Gotoh GE101A black aluminum tailpiece
● Gotoh GE103B-T black bridge
● Graph Tech Ratio Locking Tuned Machine Heads – Vintage Black 2 Pin
● Schaller black toggle switch plate
● Gotoh JCB-2 football style black jack plate
● Schaller black switch tip
● DiMarzio 36th Anniversary PAF neck pickup
● DiMarzio Super Distortion bridge pickup
● Gotoh black strap buttons
● Graph Tech TUSQ XL Nut
● Kittmer 10-46 strings
● Kittmer single-ply black back plates
● Solo Pro black pickup rings
● Kittmer black and red knobs
● Perri’s Leathers Ltd 2.5” Red Baseball Leather Guitar Strap
● All black screws and washers everywhere!
Since I used Graph Tech tuning machines I had to enlarge the holes through the headstock. I used a step drill to get them to the right size. I did the same for the holes for the controls and switch since I used imperial sized pots and toggle switch. The black rear plates for the Graph Tech tuners fit perfectly on the existing predrilled screw holes.
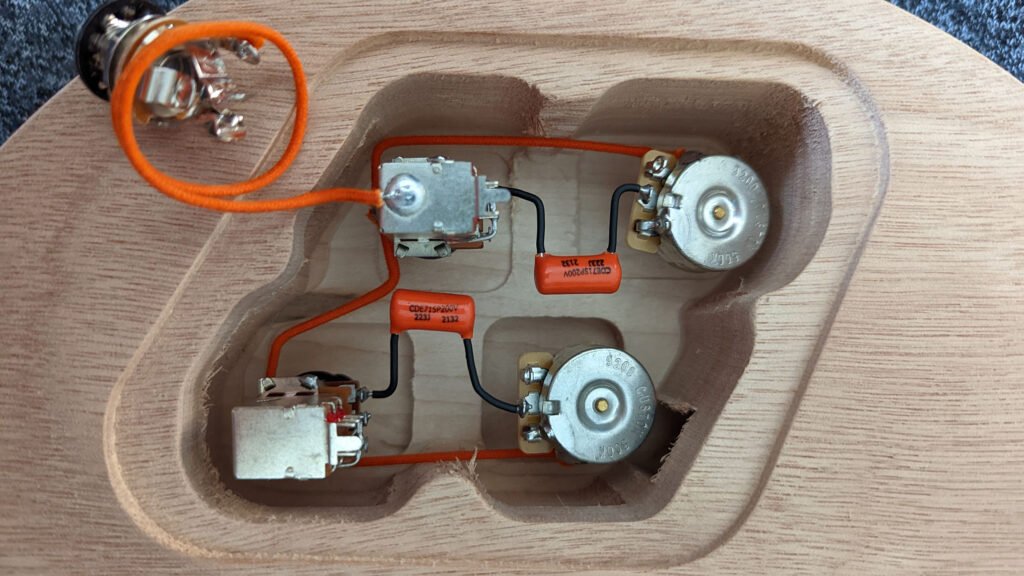
Wiring was the thing I least liked to do and the part of the build that I had the least experience with. Therefore I bought a prewired 920D Custom LP50-Split wiring harness and a prewired Switchcraft toggle switch by Emerson. For the soldering I bought the Solo Essential soldering kit. I did an ok job, not that pretty but it works. Before I installed the kit I had applied a couple of coats of Solo’s shielding paint in the control cavity. I had also bought the Solo Essential Setup Kit to do the setup. I did not do any fretwork other than some polishing with Hosco fret rubbers. Then I used the Dunlop System 65 Guitar Maintenance Kit to condition the fretboard and wax the body and neck.
The finishing touch is the custom truss rod cover by Scott at WEC Inlay in Winnipeg. It is solid ebony with a dragon inlay made of mother of pearl and abalone. I absolutely love it!
In conclusion, being my first guitar kit build I was very nervous with this build so I watched many YouTube videos and did a lot of reading on the do’s and dont’s of guitar finishing and building. I am totally comfortable with woodworking as I have done a lot of that, but I had no experience with guitar finishing. I made many, many mistakes along the way, but in the end I am very happy with the final result. It’s not perfect by any stretch but I am so happy I did it! On to the next one!
-Luigi Rostirolla


One response to “Guitar Of The Month – March, 2023”
What an honour to be bestowed upon me and my Syrax! Wow! I cannot thank enough the fine folks at Solo for starting this guitar-building passion I now have and especially for the awesome selection of guitar kits and almost all the parts, tools and supplies you could possibly need to make a guitar dream become reality. Thank you Kevin and everyone at Solo!