






General
Model Number
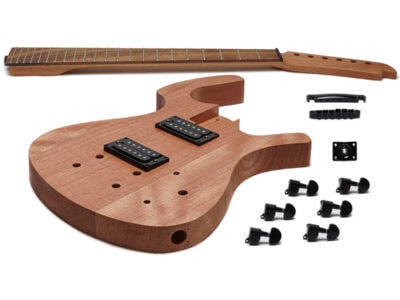
PRK-75
Series
PR Style
Body Information
Body Material
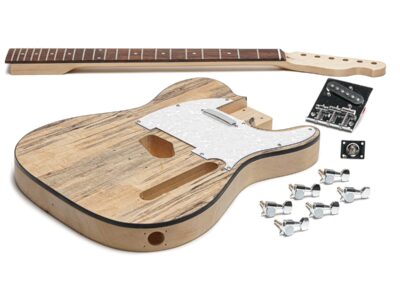
Mahogany with Spalted Maple Veneer
Body Shape
PR Style
Body Finish
Unfinished
Neck Information
Neck Material
Mahogany
Neck Finish
Unfinished
Scale Length
24.75" / 628mm
Fingerboard Material
Rosewood
Fingerboard Radius
12"
Number of Frets
24
Frets
Medium Jumbo, Nickel Silver
Nut Material
Plastic
Nut Width
42mm
Position Inlays
Dot
Truss Rod
2-Way-Action
Truss Rod Nut
4 mm Hex
Hardware & Electronics
Finish
Chrome
Pickup Configuration
2 x HB
Pickups
Ceramic Pickups
Controls
1V, 1T, 3-Way Toggle
Bridge
Tune-o-matic, String Through
Tuning Machines
Schaller Type
Potentiometers
Full Sized Pots
Misc
Includes all mounting screws, strap buttons, and plates
Accessories
Includes
Hex Adjustment Keys & Instrument Cable



bluesfan (verified buyer) –
Hi,
This is my Solo kit No 21, yes I am a fan. As usual it was a very fast shipment with first class packaging.
The body was perfect with clean cuts and routing. The spalted top veneer is fantastic with great figuring.
There is no glue line in the center joint or the contour edge, very clean.
The neck is dead straight with levelled frets and smooth ends.
The neck pocket is snug and well aligned it is a great fit.
Note that I am always using Nashville style bridges which I prefer to the ABR style as these are very narrow
and tend to rattle. The Nashville also provide more intonation adjustment and better sustain IMO. The
issue was that at the dry fit I found that the neck angle was a bit steep so I had to raise the bridge so
high the the strings were in contact with the back and the bridge. I decided to reduce the neck angle by
tapering the neck heel from the end to up to the body edge.
Here is my MISTAKE: I removed too much at the hell end so even with the bridge decked on the body the action
is high and the strings still contact the back of the bridge…
Solution: recess the bridge into the body by routing a cavity 1/8” deep and redrill the post hole a bit deeper.
I used my hand held router with a lot of care and more stress… It did the trick to perfection and saved the day!
Next time I will check my calculation and dimension twice before moving forward.
I did not use the kit hardware and electronics exept the pickup rings, the jack and the toggle switch which is good.
I got a set of 3 X 3 Wilkinson 1:19 ratio tuners from Solo, these are very accurate and stay in tune.
Modification:
Body;
since the control cavity had a SG / LP i decided a add a second volume pot so I levelled the bottom and drill
an extra hole.
Neck;
Shaped the headstock in the PRS style.
Electronics;
Pickups are Hot Vintage Alnico 5 with 8.6K in the neck and 9.6K in the bridge.
Volume pots (2) Push/Push A500K with brass sleeve and shaft for coil split. Added 1.5 resistors from
the Push/Push lug to the ground to keep some signal ( about 20%) fron the cut coil in split mode.
It gives me more meat in my split coil burger…! The pots have independent wiring and treble bleed.
Tone pot is a B500k with with brass sleeve and shaft.
Finish:
Since the Spalted veneer top was so nice I wanted to give the guitar a natural vibe and reveal its
beauty.
The top has a natural stain with 1/4” natural faux binding using an old leftover natural Minwax stain that
turned a bit amber with time. Let it dry for 2 day before varnish.
The body and neck have a mix of water base Saman stain Cognac and Dark Walnut diluted with water.
I did use 3M pinstripe tape to mask the faux binding then applied the color on the side and back. Then
applied 1 coat of varnish over the stain to seal it the prevent color tranfer to the faux binding. Then remove
the tape and put a new one over the colored portion then did the natural stain on the top and faux binding.
It worked great and I have a nice clean crisp line.
The headstock is stained black. I have 4 thin coats of Samans water base flat varnish, sanding with 3M Scotch
Brite grey pads after each coat. Also aged the finish for a vintage look.
Setup;
It was a piece of cake, just polished the frets, lowered nut slots to my taste, the trussrod is very responsive
so I have a very low action without fret buzz. The intonation is spot on.
I just love the look, she sounds great and is very easy and comfortable to play.
Thanks again Solo for these fun kit.
Michel
RYAN MUELLER –
I’m rating this 3 stars mainly because the finished guitar at the end of the day is still pretty sweet. Had that not been the case, I would definitely rate it 2 or maybe even 1. There were some things about building this kit that irked me, and I want to make it known for those purchasing the kit so they’re aware, and to bring the awareness to Solo in hopes that they course correct a few things (at least what’s within their control). Quick Disclaimer: I did not contact their customer service after purchasing the kit and have heard great things about it, so they may have been helpful in some instances had I decided to reach out to them. Another disclaimer: I have quite a bit of woodworking experience building furniture, but haven’t done it in over a decade since I switched careers, so my own knowledge is admittedly a little rusty.
To start off, I wanted to replace the plastic nut with a graph tech tusq nut just as a quality upgrade. But knocking the plastic nut out was unnecessarily difficult. It’s generally well known in guitar building/maintenance that a nut should only have a couple drops of glue to keep it in place and prevent it from moving, but allow it to be easy to knock out when it inevitably gets worn out and you need to replace it. That wasn’t the case here – whoever manufactured the kit either used an absurd amount of glue or maybe even a little epoxy, because this sucker was practically “welded” to the neck. I had my chisel against it and had to smack it HARD with a wooden mallet, before it finally broke off – and took a nice big shaving of the headstock with it. Luckily the tear-out was pretty clean and I have the experience of doing a decent repair, so I was able to scrape that chunk off the old nut with my chisel and glue it back in place (along with some oak veneer I’d kept for just such an emergency). Plus the seam of the break was hidden nicely once I stained it, so you’d have to really look for where the repair was. But all that said, the fact I had to do this at all was completely unacceptable – again, this is a part of guitar building and maintenance that’s generally well-known in the community (although I guess not well-known enough), and someone who doesn’t have the skill to fix this would be seriously disappointed.
Moving on, I stained the guitar red, and the first coat on the body was blotchy as hell. The lovely spalted top looked completely ruined with these overly dark patches that covered the grain pattern, along with some areas that hardly accepted stain at all. It took me Googling and searching Reddit to learn that generally speaking, you don’t stain spalted maple because since it’s harvested when it’s already rotting, the wood density can change dramatically throughout a single piece and thus it won’t accept stain evenly. This was the case here. That said, this was fixed by sanding the dark patches with 320 grit sandpaper, which lightened the dark spots and got the grain to shine through better. Rinse and repeat 2 more times, and I got the finish I wanted without sanding through the ultra thin veneer, doing a final sand after the 3rd stain coat before going to the clear.
So I got the color and look that I wanted. All’s well that ends well, right? Well yeah, but I bring this up because I purchased this kit from them *in person* (I live in the GTA so I traveled to them), talking to one guy on the sales floor and another guy in their back shop where they do repair work and I believe finishing as well (I could be wrong on that). I clearly told them my intentions of wanting to stain this guitar, and I’m pretty perplexed as to why neither of those guys had the foresight to tell me “hey, you might want to reconsider that idea, it might not turn out so well” – because if I sanded through the veneer, it clearly wouldn’t have (granted, these guys were still helpful in many other ways, so I’m not trying to knock them personally).
The assembly and the rest of the finishing went fine, though I should mention that when the bridge pickup is screwed in with the pre-drilled holes, the pole pieces are a little off center from the strings which will affect your tone. Not an issue with Solo specifically, but with whoever manufactured this kit. Not a dealbreaker, but if you want them centered (generally recommended) you will need to plug and re-drill the holes yourself. I only noticed this after the guitar was fully put together and should have done a test fit prior to staining and clear-coating. Oh well, live and learn. On that note though, I’m surprised that the kit comes with flat pickup rings instead of arched, considering the top is also arched. The pickup rings bend as you screw them to the body, which does work fine but I’m concerned how long these will hold up before cracking or breaking over time. I can’t imagine it would’ve been that much more expensive to include arched pickup rings, although perhaps they wouldn’t have matched the contour of the body itself. Who knows…
Anyways, onto wiring – which was a huge pain in the a**. The diagram on the sales page for this kit is straight-up wrong, not only in where the wires need to go but also in showing a different switch than what’s provided in the kit. My dad and I had a hell of a time trying to figure it out (I’m a newbie and he hasn’t done this for 20-30-odd years, so he’s quite rusty but he tried his best) and after a few hours, our first attempt ended up not working. It took a matter of me later searching on YouTube and finding a tutorial from a different guitar kit company (Vibeworks Guitars, for those interested) where the guy had the exact same electronics on a flying V and walked you through step by step for me to get this wired correctly. Aside from all this, the written manual was lazy and just said “Proceed to solder all the connections as per the diagram” – in other words, “just do it bro.” Gee, thanks, tips. Like I understand that it’s a kit build and some learning and possibly mistakes is bound to happen, but someone who hasn’t done this before or has no experience soldering electronics is going to be confused and understandably frustrated. Please update your manual and diagrams and make this not only correct, but more thorough in its steps. As my shop teacher used to say, make it idiot proof!
The last bit of frustration came with installing the bridge. The holes for the bridge sockets were not drilled straight; they were slightly angled. Thus, when we inserted the sockets and then screwed in the posts, the bridge didn’t want to sit on them because they were angled outward. We were smacking the hell out of these sockets trying to bend or smush them into the proper angle so the posts would stand straight for the bridge, and we ALMOST succeeded (and thankfully the body was unscathed; good thing we had a rubber mallet). Eventually our arms were getting tired, so we decided to take a drill and slightly enlarge one of the holes in the bridge, which finally did the trick. This really irritated me because this step should have been EASY, but was more unnecessary frustration after the whole wiring debacle.
So after all that, the guitar finally came together and the end result, like I said at the beginning, is still pretty sweet. The body looks nice, the neck feels great and the neck angle was spot on. Once I strung it up it barely needed any set up work, aside from a slight truss rod tweak and the slightest adjustments on the bridge saddles when intonating. The pickups are only decent at best, but considering it’s a kit and not super expensive, you get what you pay for. I have a friend who will be trading me some nice Seymour Duncans in exchange for a vinyl record, so I look forward to getting those installed. I also plan on bringing this to an amazing tech who I’m friends with to level and clean up the frets a little bit (they’re not bad, but need a bit of work and I’d rather practice on some scraps before potentially ruining this myself). The body feels good to hold, although an extra contour for where your strumming arm goes would be nice (though this is admittedly nitpicking now).
At the end of the day, frustrations aside, the guitar turned out pretty great and I’m happy with it. I WOULD consider purchasing a different kit from Solo in the future (I have my eye on that Les Paul with the F-holes). I just hope the guys at Solo read this review, consider what I’ve written as constructive criticism and hopefully improve what’s in their control in the future. I’m not extremely optimistic on that, considering I’ve seen some similar gripes in other reviews on this site (particularly about the wiring diagrams), but alas, you don’t know unless you try.